

Malware can ruin your website. Not only can it insert ads or redirect users to a different site, but it can also get your site blacklisted from search engines and other online services. Fortunately, the malware is usually coded in a file such as within a database, in a plugin, or in a theme that can be deleted easily. In this article, we’ll see how to clean a hacked or infected WordPress website. Read on or watch the video here:
Malware Example: Redirect
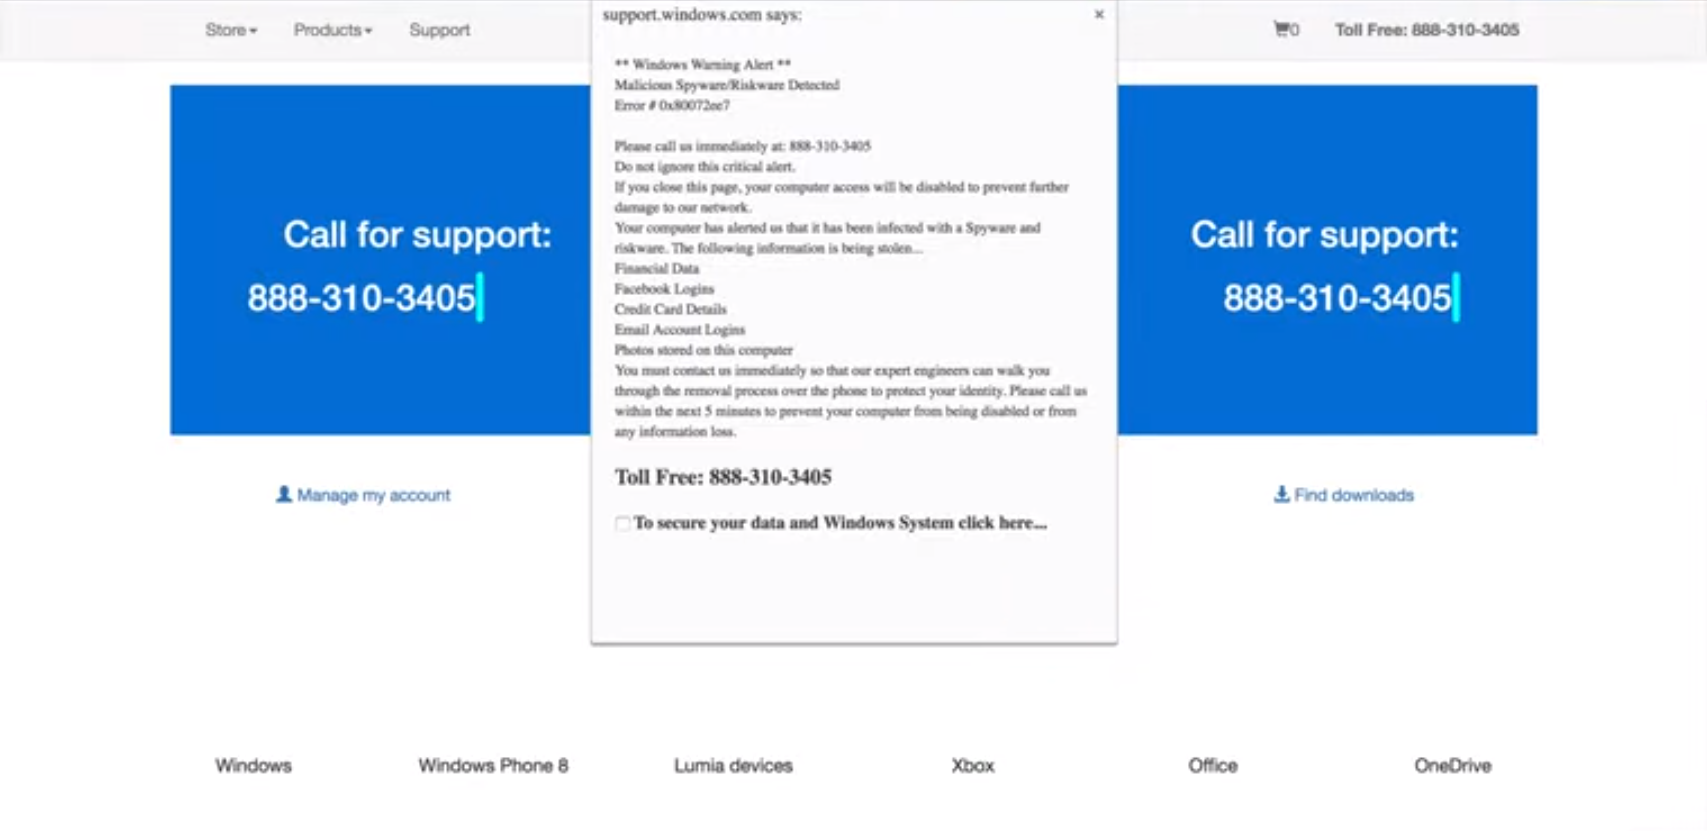
Here’s an example of a website infected by malware. This type of malware is called a redirect. When the visitor attempts to visit the site they are redirected to a different website that informs them they have spyware, viruses, etc., in an attempt to sell them software that will supposedly clean the malware from their computer. It looks like an official warning from Microsoft or some trustworthy company, but it’s fake.
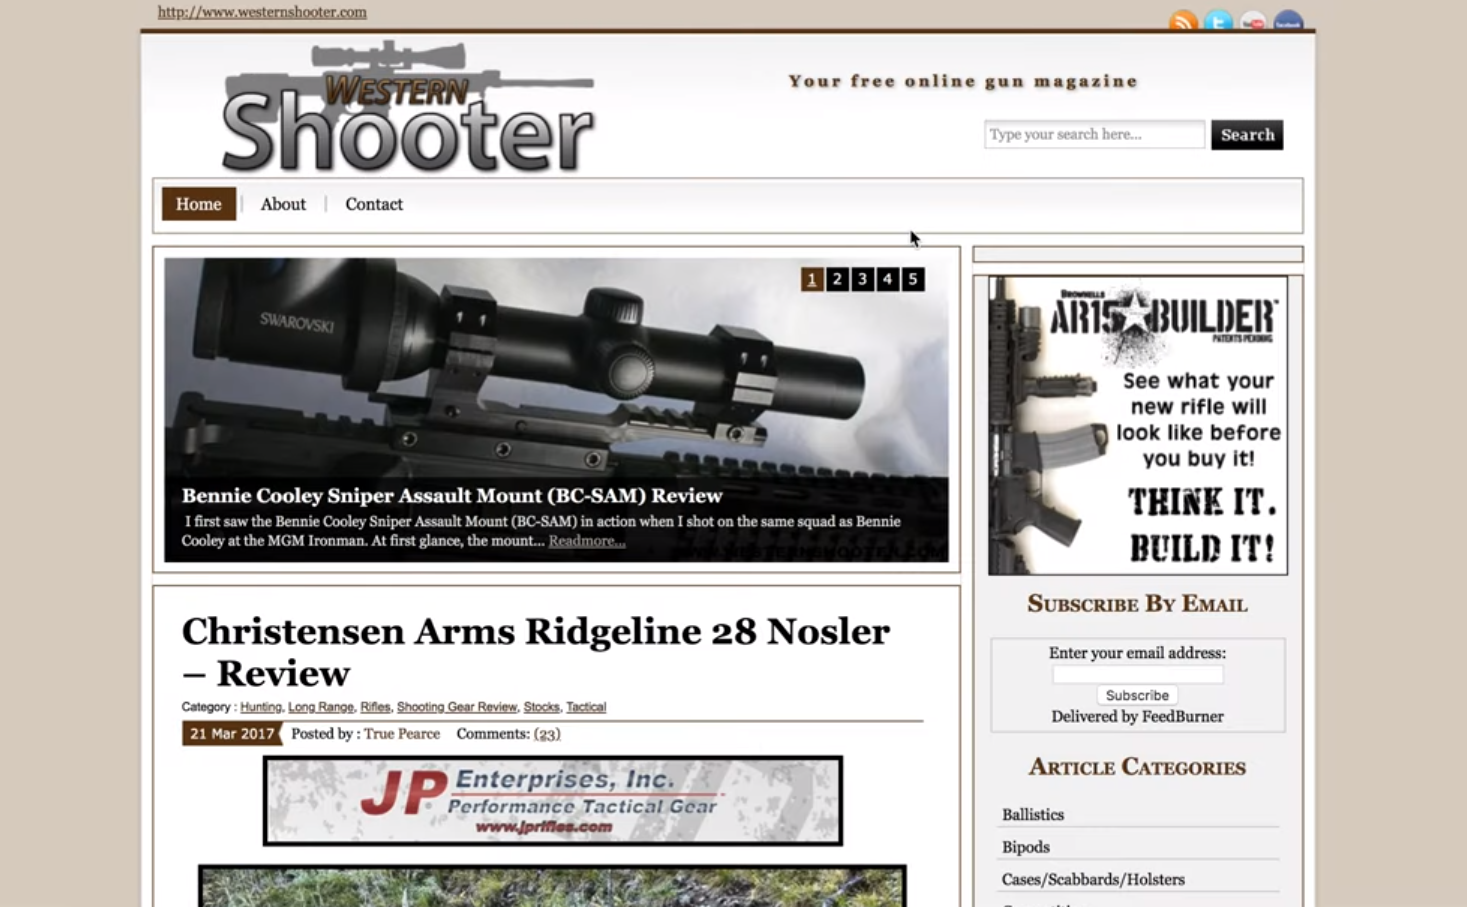
Here’s the actual site. In this case you just have to visit the URL again, and it’ll let you through to the actual (though infected) website. This particular malware is not a threat to your computer, the site it redirected to is just trying to scare you into installing some malware, under the guise of anti-malware, that could be a real problem if you downloaded and installed it.
How to Clean a Hacked or Infected WordPress Website
Here are the steps to check and clean the site of malware.
1. Identify the Type of Infection
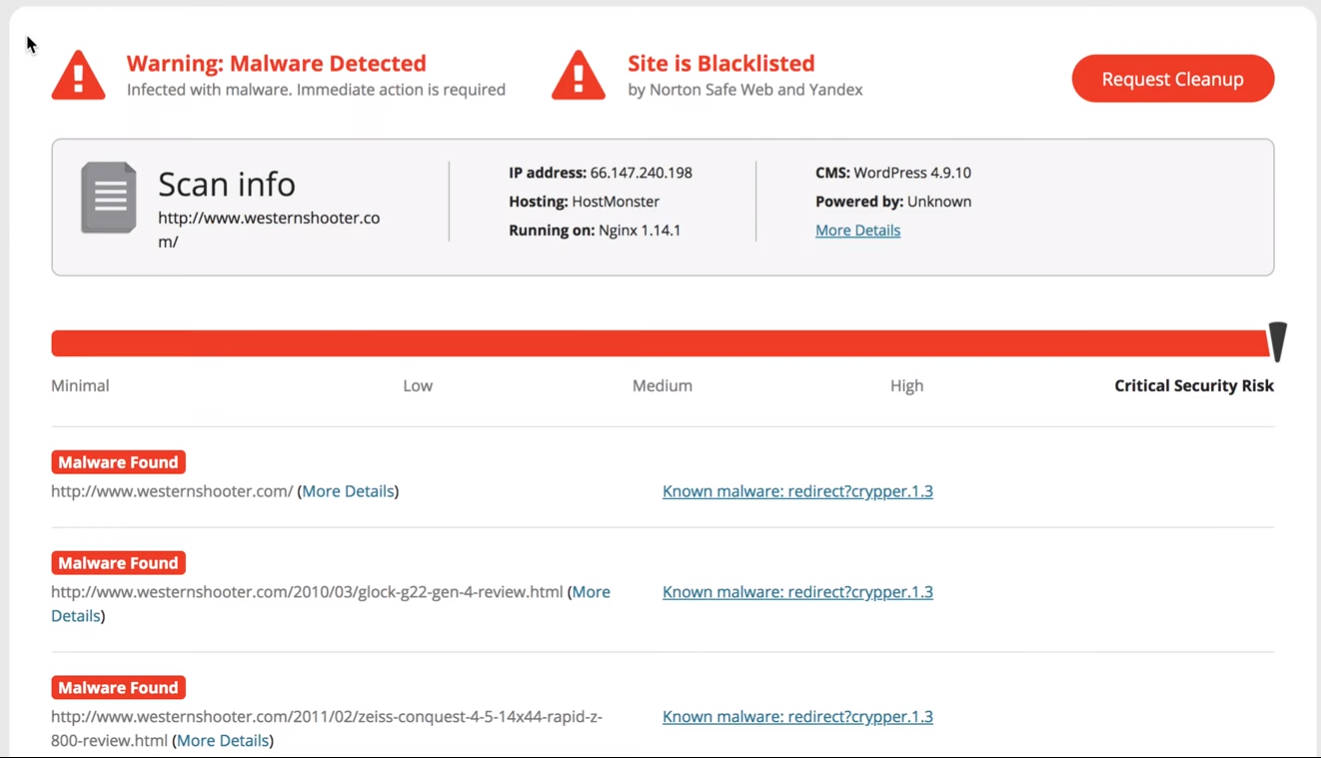
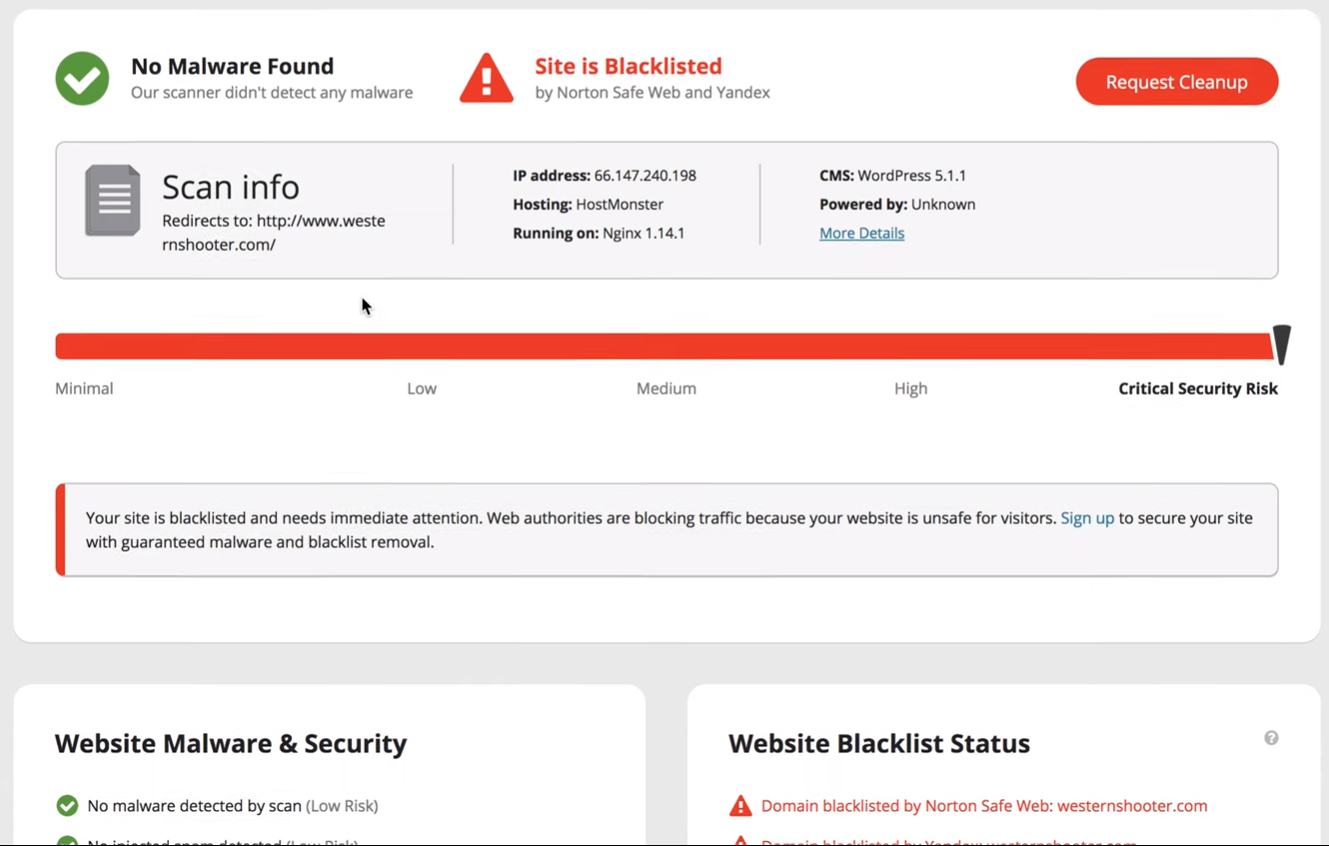
Use a scanner, like Sucuri Site Check, to get information about the site. It shows that the site has malware and that it’s blacklisted. It shows the folders where the malware is found. Click the links to see more information. In this example, the malware entry is a redirect.

Click More Details to see the script. This provides information that you can use to troubleshoot. For example, you can use the URL of the script and search the database to find the script itself in order to delete it.
Open each of the details to get as much information as you can. This example shows a cookie that adds another URL to check.
The blacklist info shows which sites have blacklisted your website. In this example, it’s on both the Norton and Yandex lists. Once you’ve cleared your site of all malware you can click Request Blacklist Removal if you want to pay Sucuri to submit it to them for reevaluation. Otherwise each site has its own method you can find to to submit your site for reevaluation for free.
2. Assess WordPress’ Current Security Situation
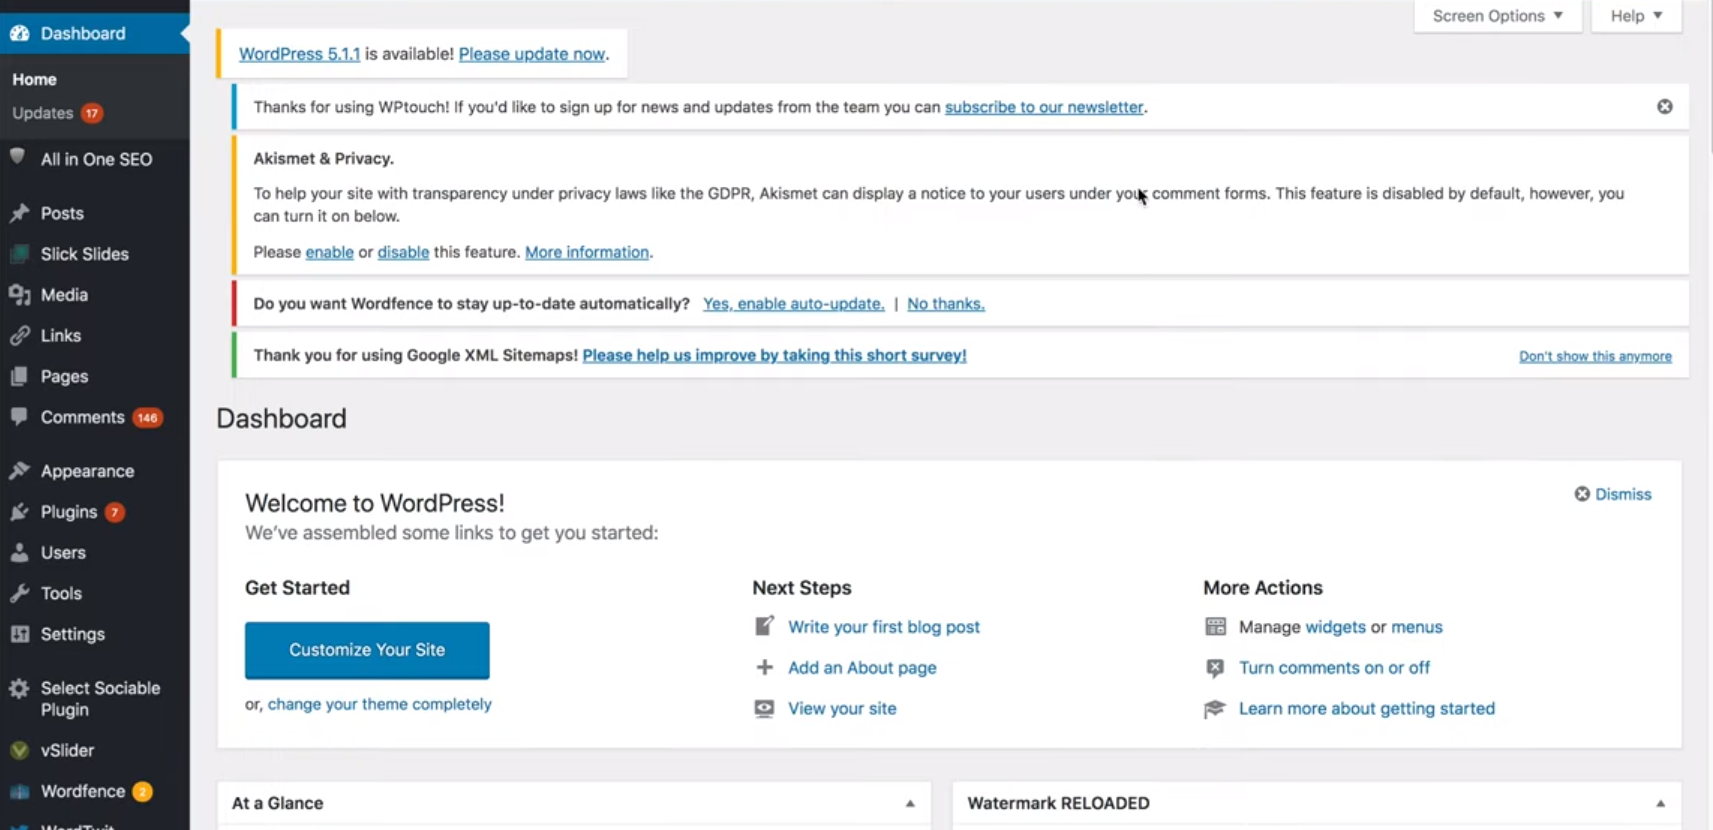
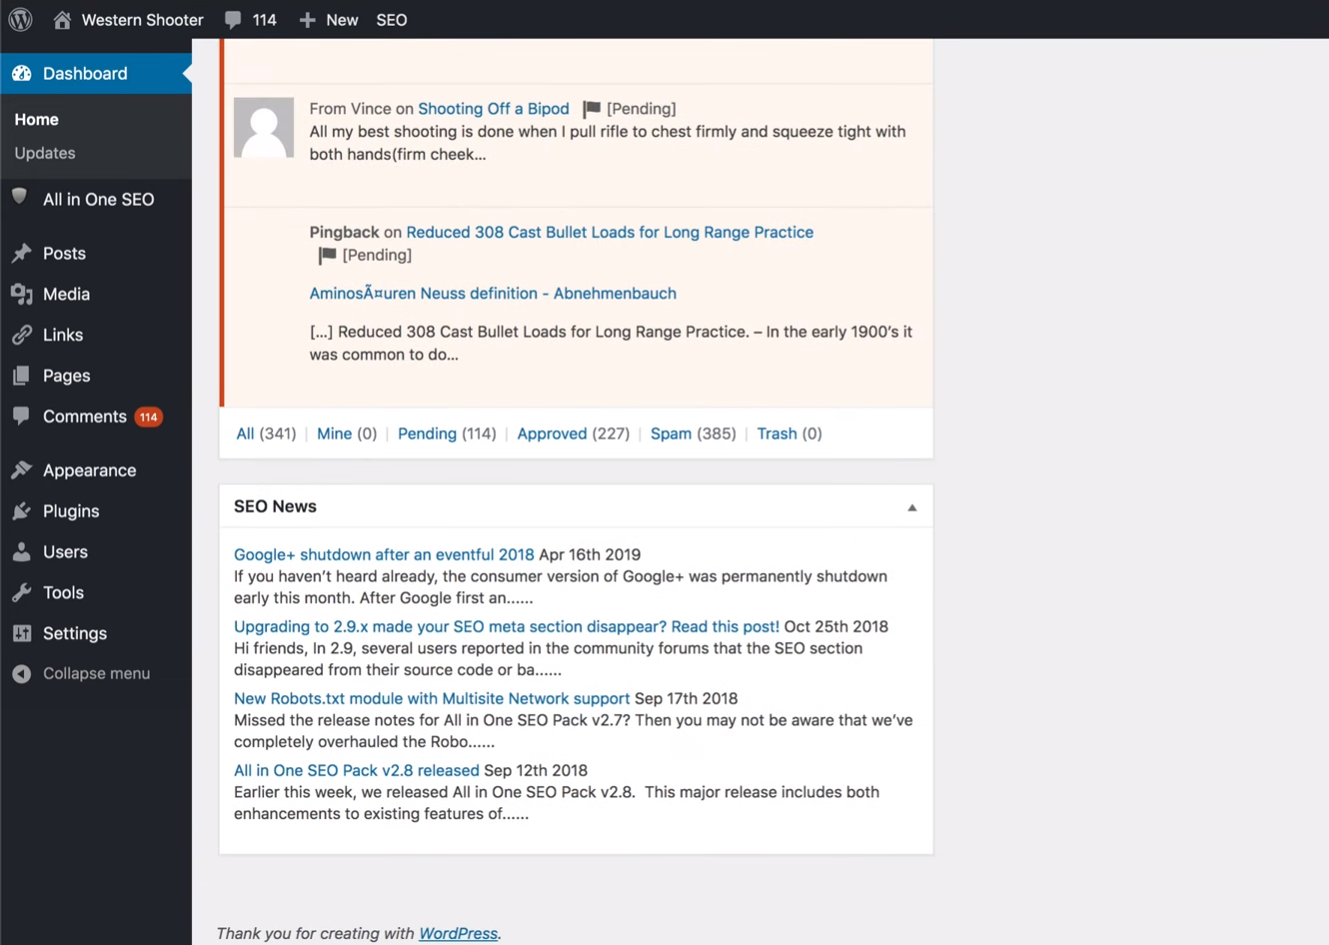
Login to the WordPress website. In this case, there are lots of updates available. WordPress doesn’t highlight the current version, so it can be difficult to know how far out of date it is. You’ll find the current version in the dashboard in the At a Glance window.
In this case, the site was running a security plugin, but it may not have been configured or updated. Even security plugins can have vulnerabilities and hackers can exploit them if the plugins are not updated.
3. Determine How WordPress is Setup
Log in to your host’s cPanel or into your FTP account and view the files. This is the cPanel for HostMonster. Most hosts have their own design for cPanel, but the tools and features will work about the same. In cPanel, select File Manager.

Next, determine where the files are stored for this particular website. In this case, there are three possible websites for this domain.
If There are Multiple WP Sites, Find the Correct Folder & Database
In order to determine which folder on cPanel that this site belongs to, go to phpMyAdmin in cPanel. You’ll find it under Database Tools or you can search for it.
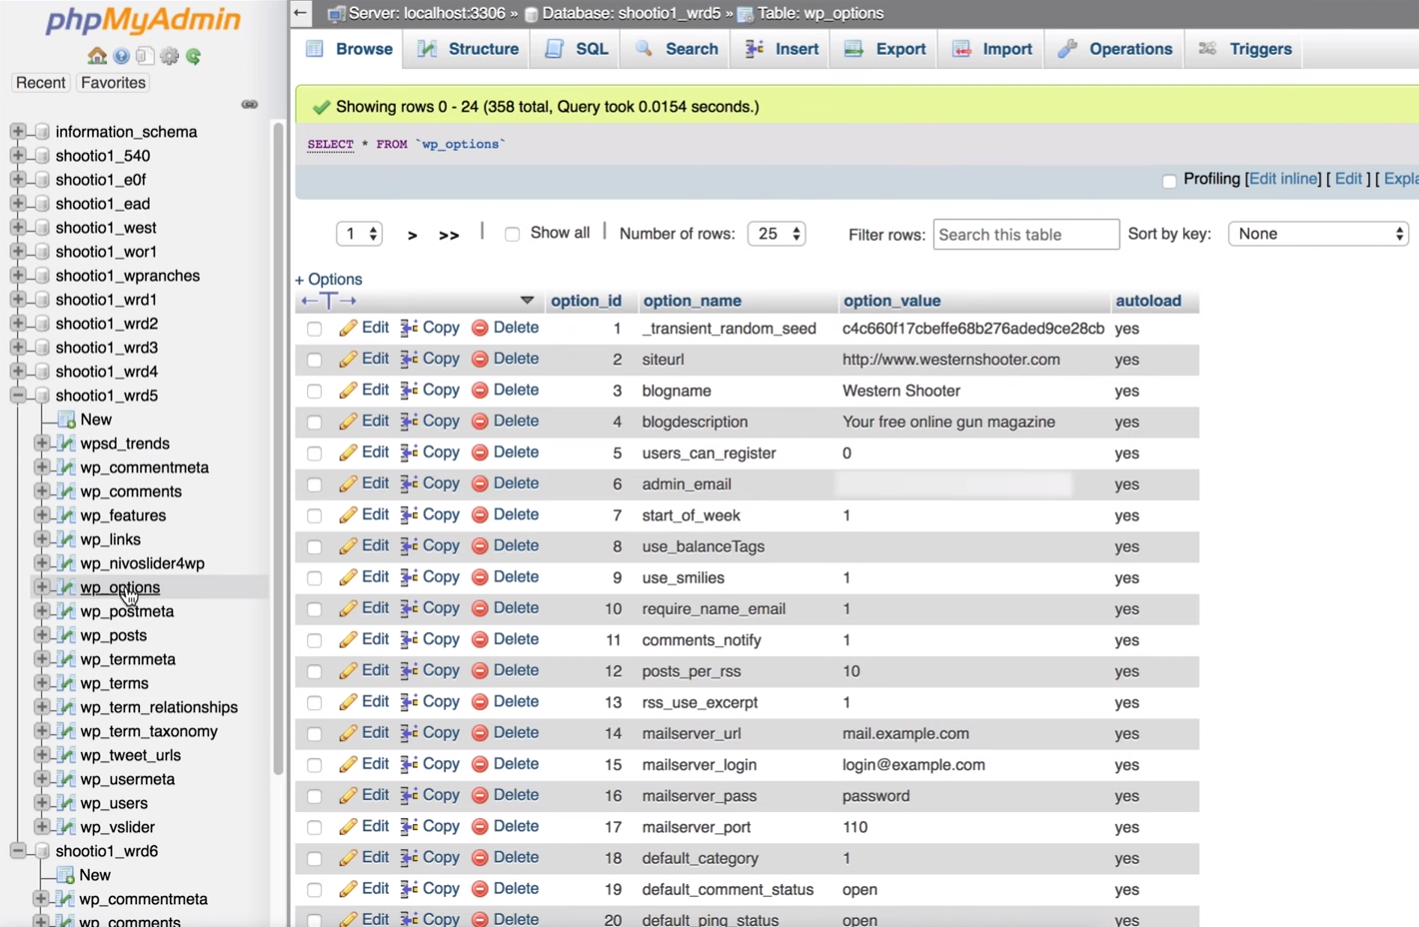
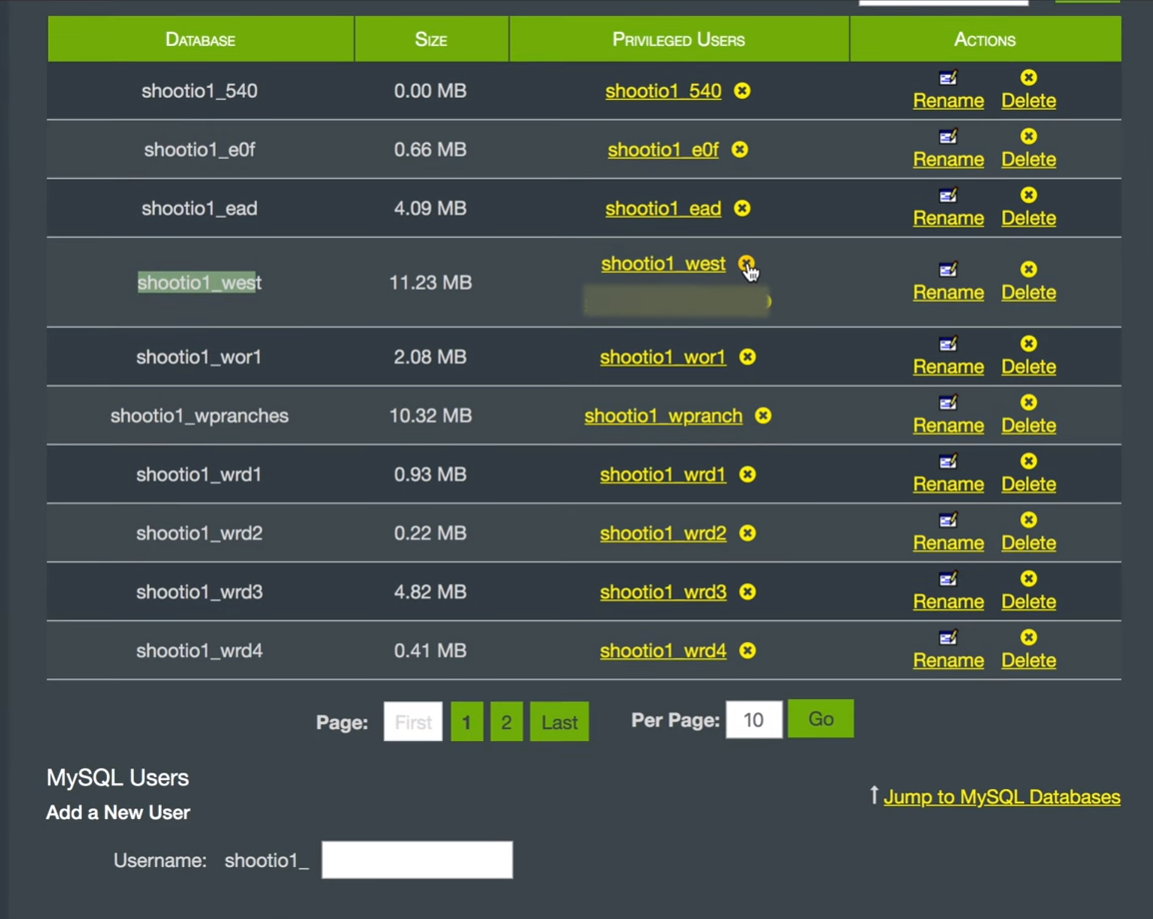
The list of databases appears in the left window. Open one of the databases and then open the wp_options table. This opens the files so you can check for the domain associated with the files. This one does have the correct domain and site name, but it might not be the live site. Check the rest of the databases and identify all of the databases associated with the site.
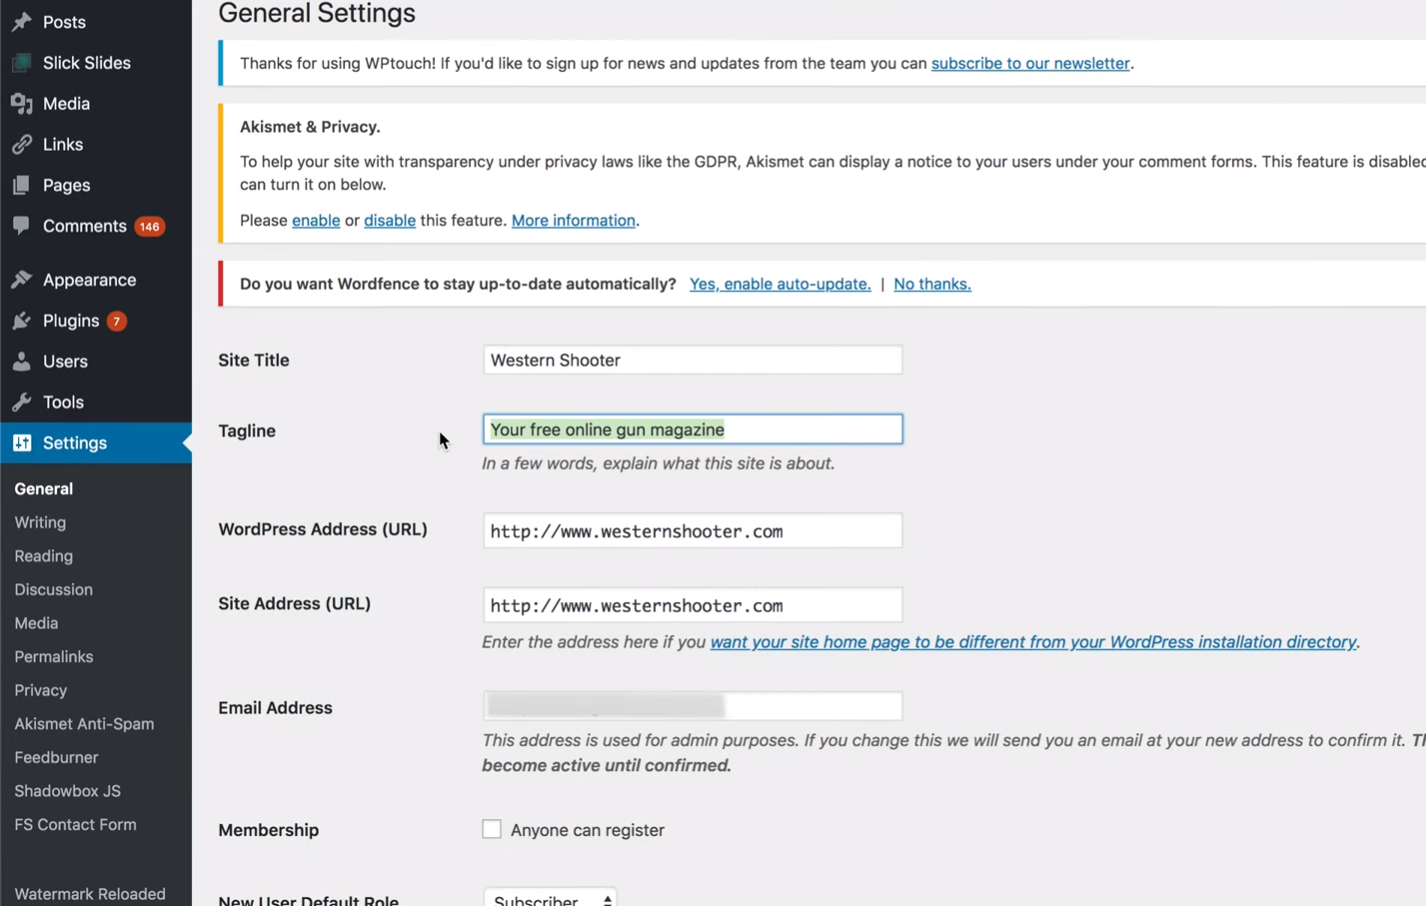
To help locate the correct database, go to the WordPress site and look for things that match between the site and database. For example, see if the tagline matches the live site.

Go back to cPanel (or FTP and navigate to the same files). Check the site in the public_html location first. Select and edit the wp_config.php file. Look for the database name. In this example it matches the database that we’ve already determined is not the live site. This version of the site is a liability since it has not been updated and is therefore likely vulnerable. It should be removed from the server.
If you’re still not sure if you have the correct database, change the tagline on the live site. This will be written to the database and the live database will easily be identified. All of the other databases and associated folders should be deleted.
At this point, we don’t know which files should be here and which shouldn’t. In our example, this WordFence file might not be a legitimate file. Each file will need to be analyzed or removed. It’s best to delete them and install fresh versions of the plugins.
Using FTP
Alternately, you can use FTP to access the files. In your cPanel, select FTP and set up a new FTP account.

Next, use an FTP client such as Transmit for the Mac, as seen above. This shows the same file structure as you’ll see using cPanel. To see everything you need, turn on hidden files.
4. Replace Plugins with a Clean Copy or Alternate
Start by deleting the old plugins and getting fresh copies. Old plugins can have security holes which provide backdoors for hackers. Deleting them deletes the folder itself including any malware that might be in the folder. Reinstall those the site needs. Also, look for better plugins. Be sure to check plugins for known vulnerabilities.

Click the View Details link for each plugin in your plugins list to see when they were last updated. In this case, this plugin was updated 7 years ago. It’s best not to use plugins that haven’t been updated in over a year or two. Remove all of the older plugins. This will remove some of the functionality of the site, but it’s best to replace those features with newer plugins.
Even for plugins updated recently, the best practice is to update them so that any changes in the database that are part of the update will take place. Then download a fresh copy from WordPress.org or wherever the plugin comes from. Now go in to your host’s file manager or your FTP client and delete the plugins folder. Then upload the fresh copy of the plugin to replace it.
5. Replace WordPress Themes with Clean Copies
Out of date themes can also contain backdoors that hackers can use. Check to see if the current theme has been updated. Remove all themes that the site is not using. Delete the theme the site is using and upload a fresh copy to ensure there are no infected files hiding in the theme folder. Be sure to back up all theme files, layouts, customizations, etc. before deleting the theme.
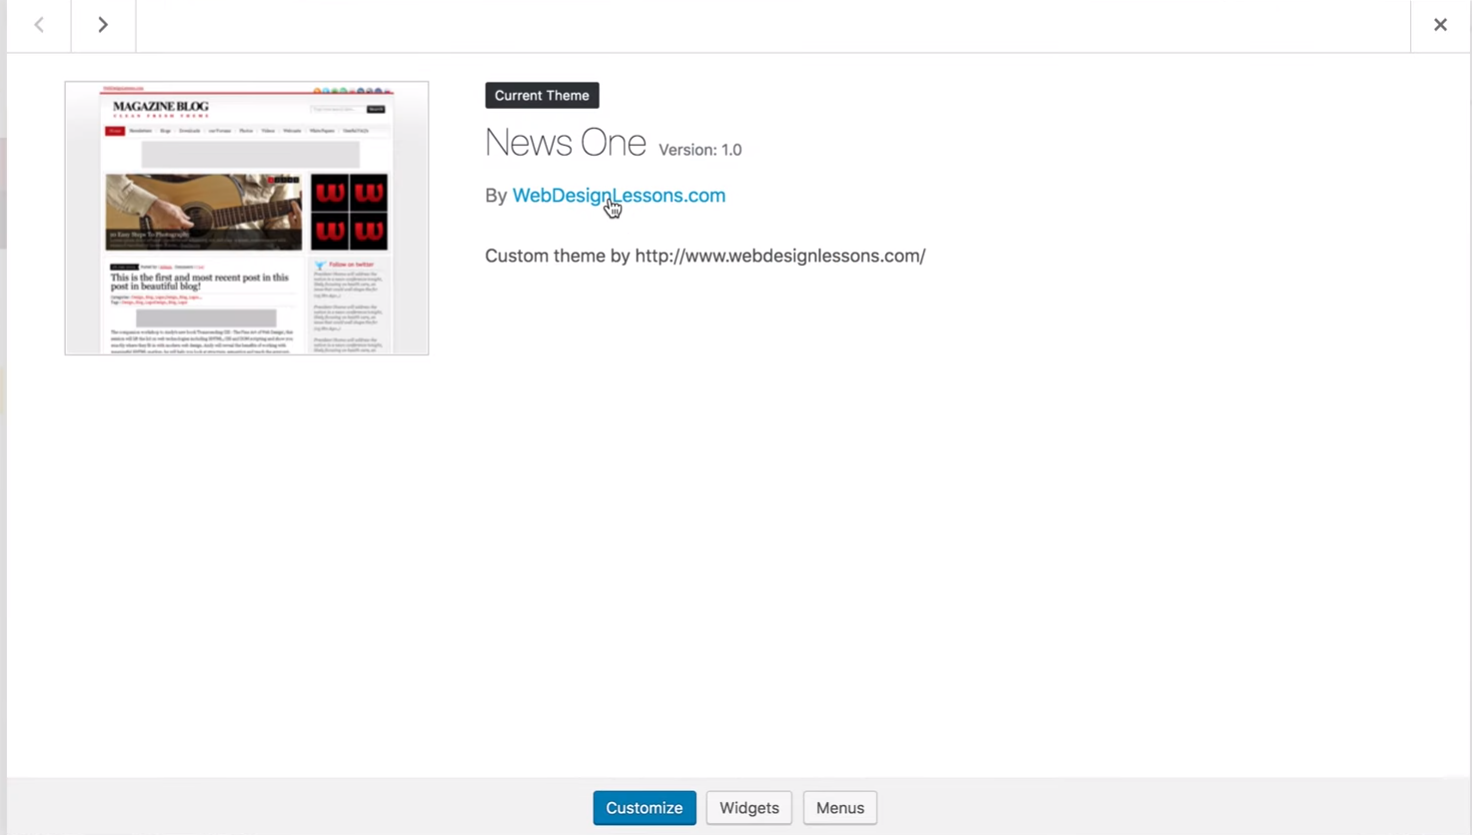
Click the link within the theme’s details to see when the theme was last updated. In this case, the website for the theme’s developer no longer exists. Delete all of the old themes. If the current theme doesn’t have an update, replace it with one of the more recent default themes in the WordPress repository.
For any themes that you do keep, it’s best to download a clean copy of the latest version. Then just like with Plugins, delete the folder via File Manager or FTP and upload the new, clean copy in its place. This way you know all the files are clean for that theme, and haven’t been injected with malware.
6. Replace WordPress Core with a Clean Copy & Clean Other Files
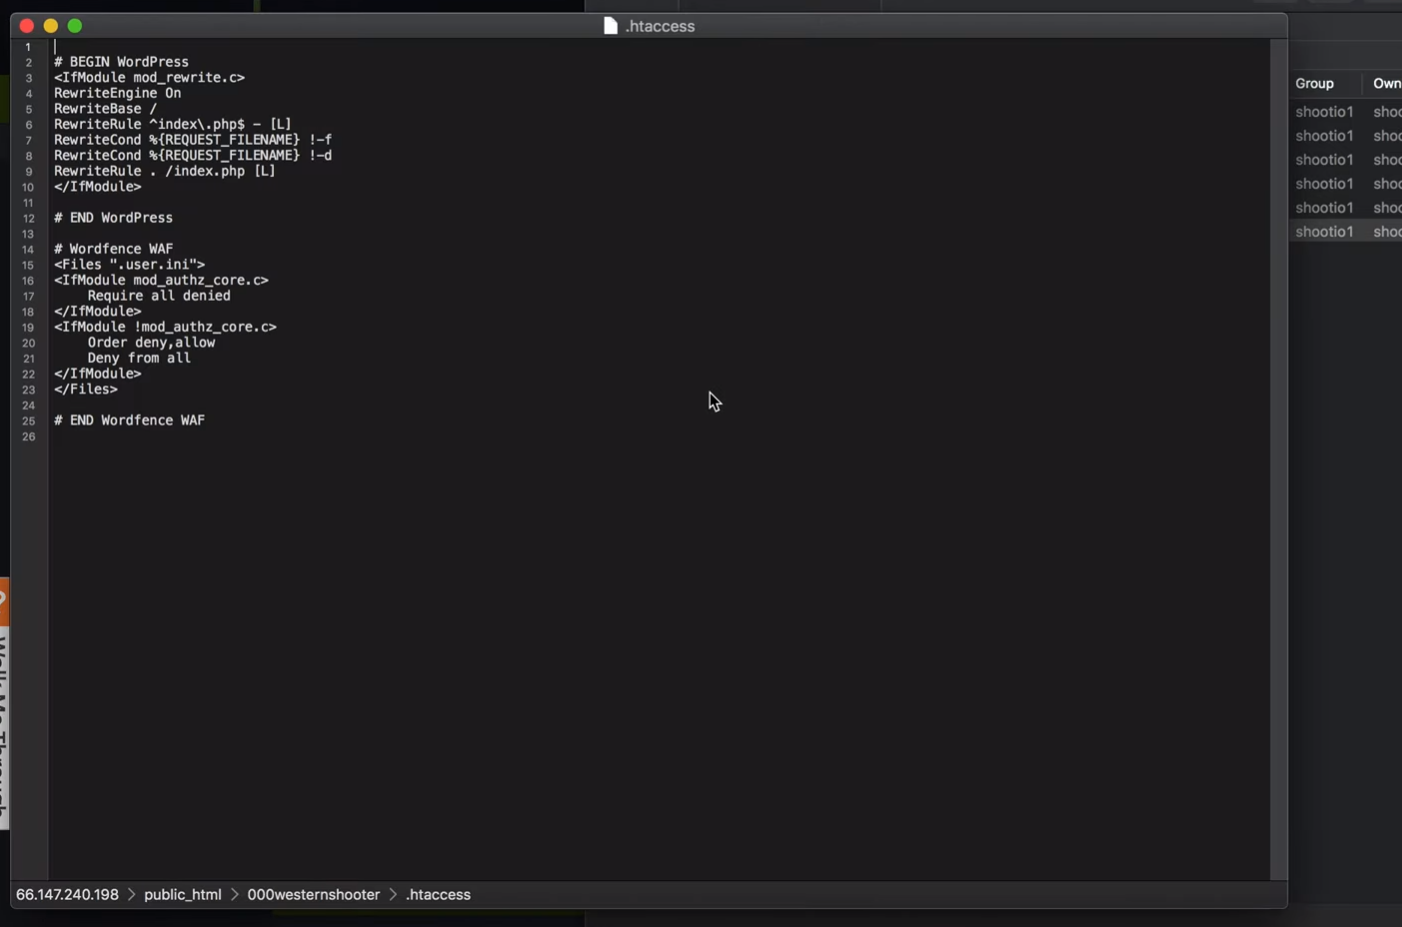
Open each of the files to ensure you actually need them. Delete anything you don’t need. Open the .htaccess file and make sure the file is clean. Malware doesn’t usually write to the .htaccess file, but it is possible and it can do a lot of damage to the site. You can get clean code from WordPress.org to paste back into your site’s file. Leave the wp-content folder intact as you don’t want to delete all your plugins, themes, and media files.
Go through each of the WordPress folders to see if there are any files that should not be there. Check the wp-content folders such as plugins, themes, and uploads, for PHP, JS, .htaccess files, etc. Most hosts have folders such as wellknown, quarantine, and cgi-bin. If you’re not sure if these folders should be there, check with your host to see if they’re normal.
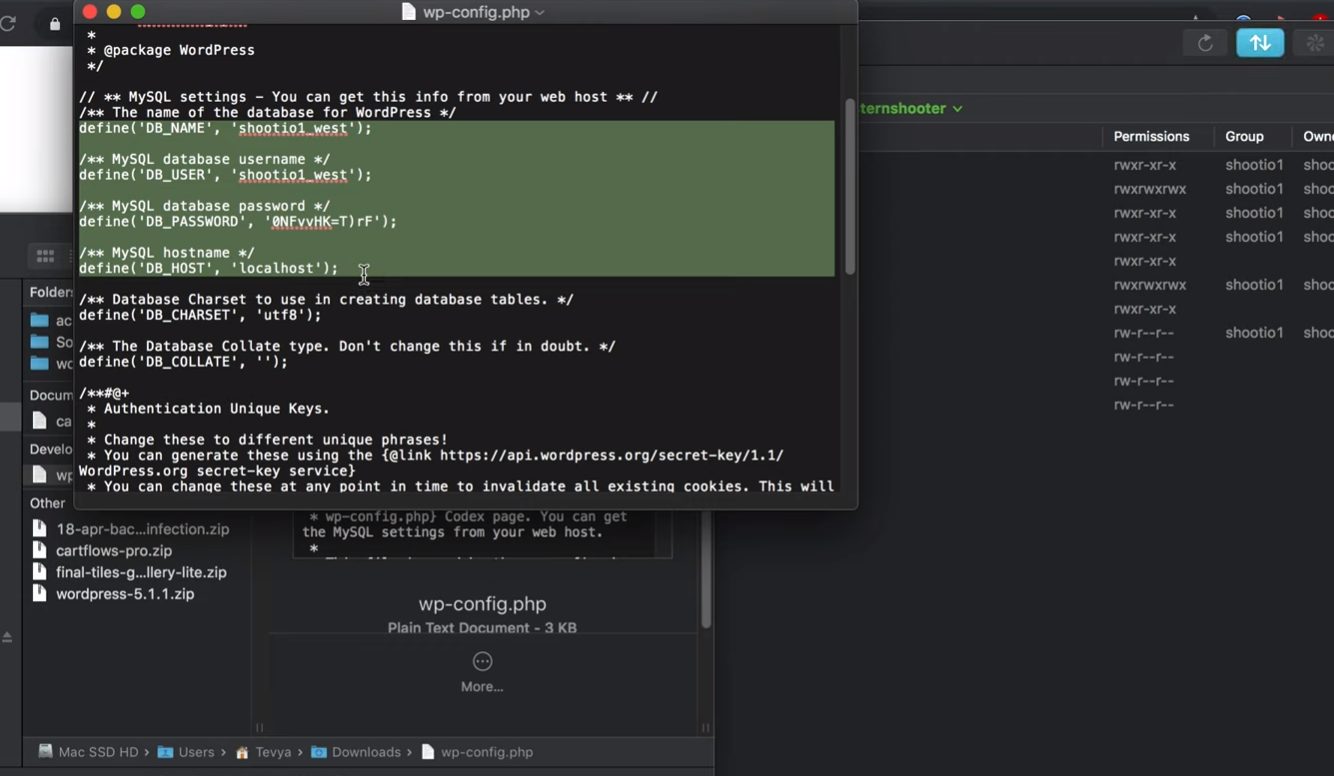
Open a fresh copy of the wp-config.php file in a text editor. This can be from a backup or from downloaded version of WordPress. Copy the database connection settings and the table prefix and paste into a new wp-config file to upload.
If you’ve confirmed the file is clean you can upload the entire file and make the changes you need for authorization keys. Once all of the files are uploaded the site should work.
7. Clean the Database
Check the database for infected files. You can do this manually or by installing a scanner such as WordFence. It’s a good idea to use both, just to make sure the database is clear. One method might catch something the other misses. The manual method is done In cPanel.
First, make a backup. In the File Manager, select the Export tab. Choose the export method and format. The default settings should be fine. If you have issues with your database you can import the file and have your original settings back.

Go to the Structure tab. Browse the result to see what can be deleted. Delete any files pertaining to plugins that you’ve deleted. Select the files, click the With Selected dropdown box under the files, and choose Drop. Approve the deletion when it asks. Make sure to leave all of the normal WordPress files.
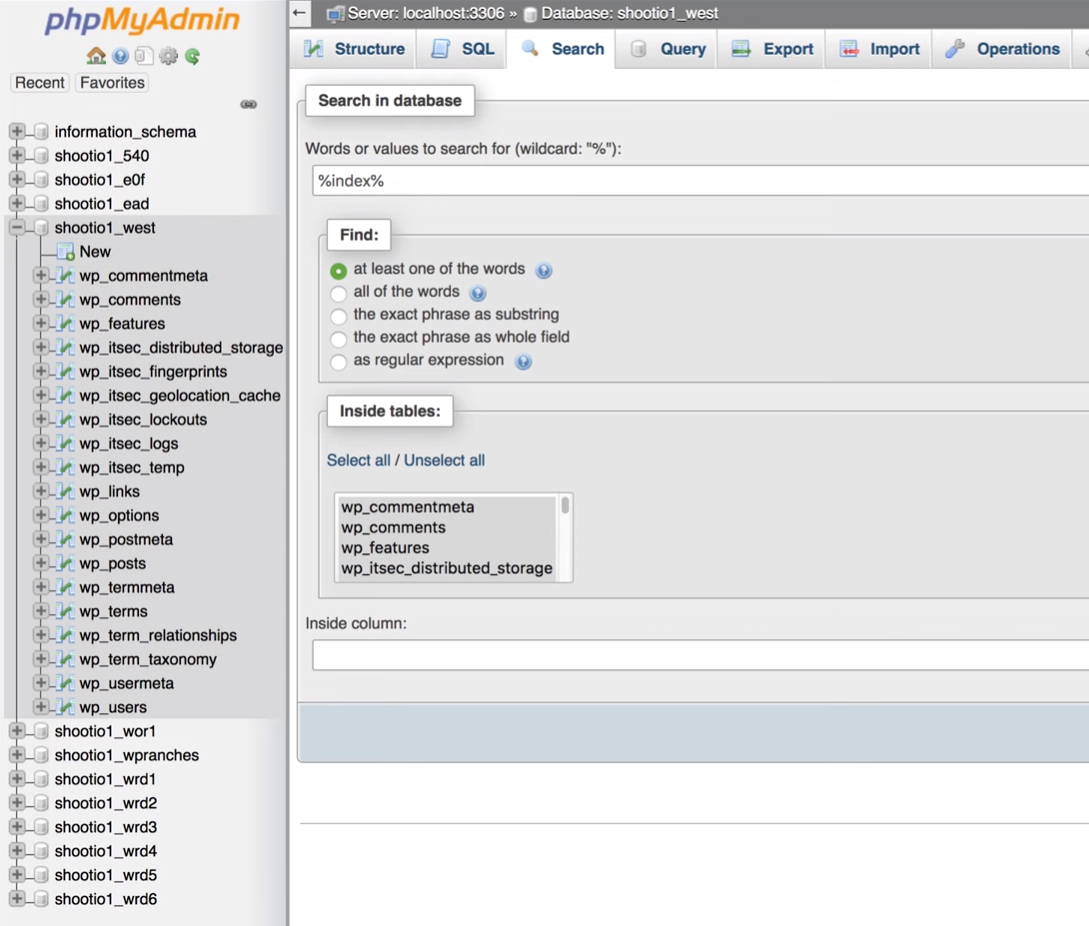
Next, select the Search tab and run a search for any files you saw in the Sucuri Site Check or in messages that WordPress may have displayed after deleting files.
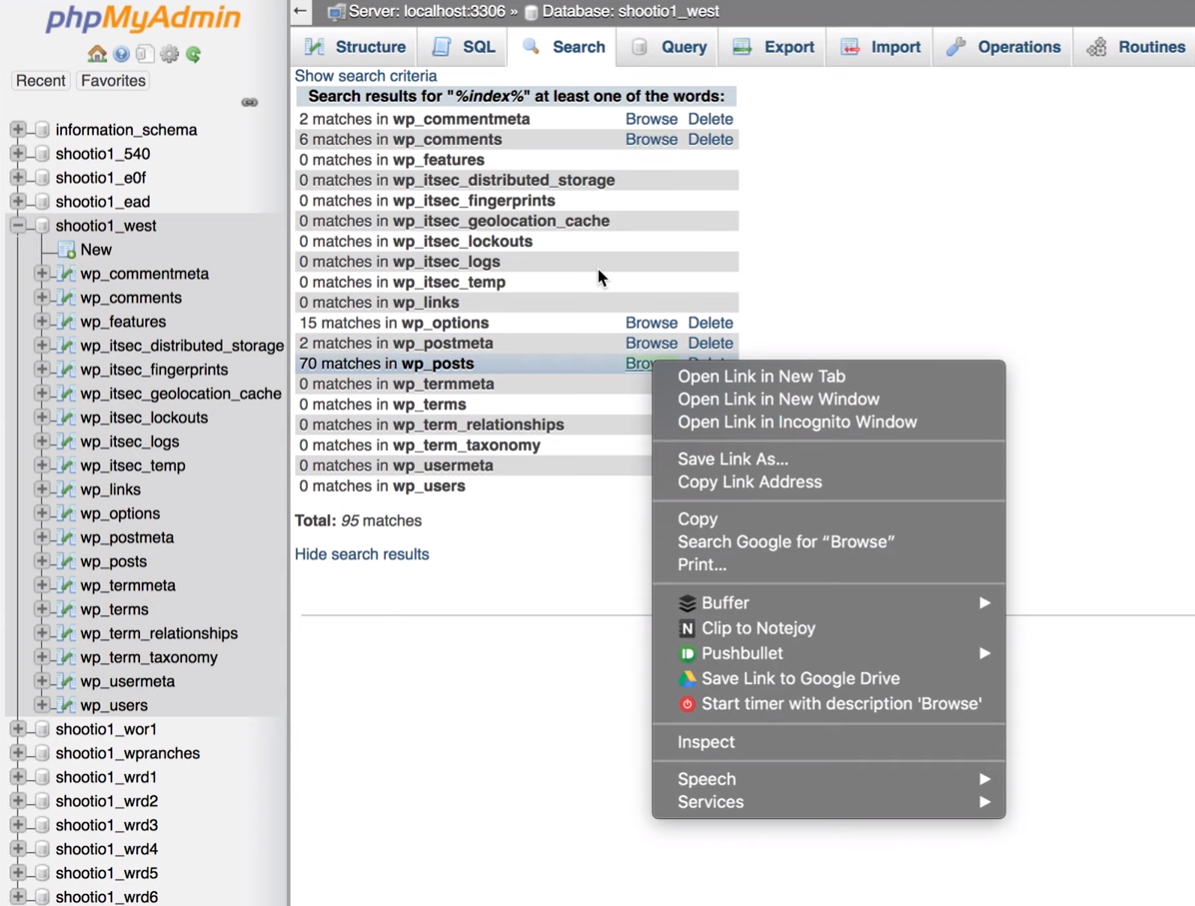
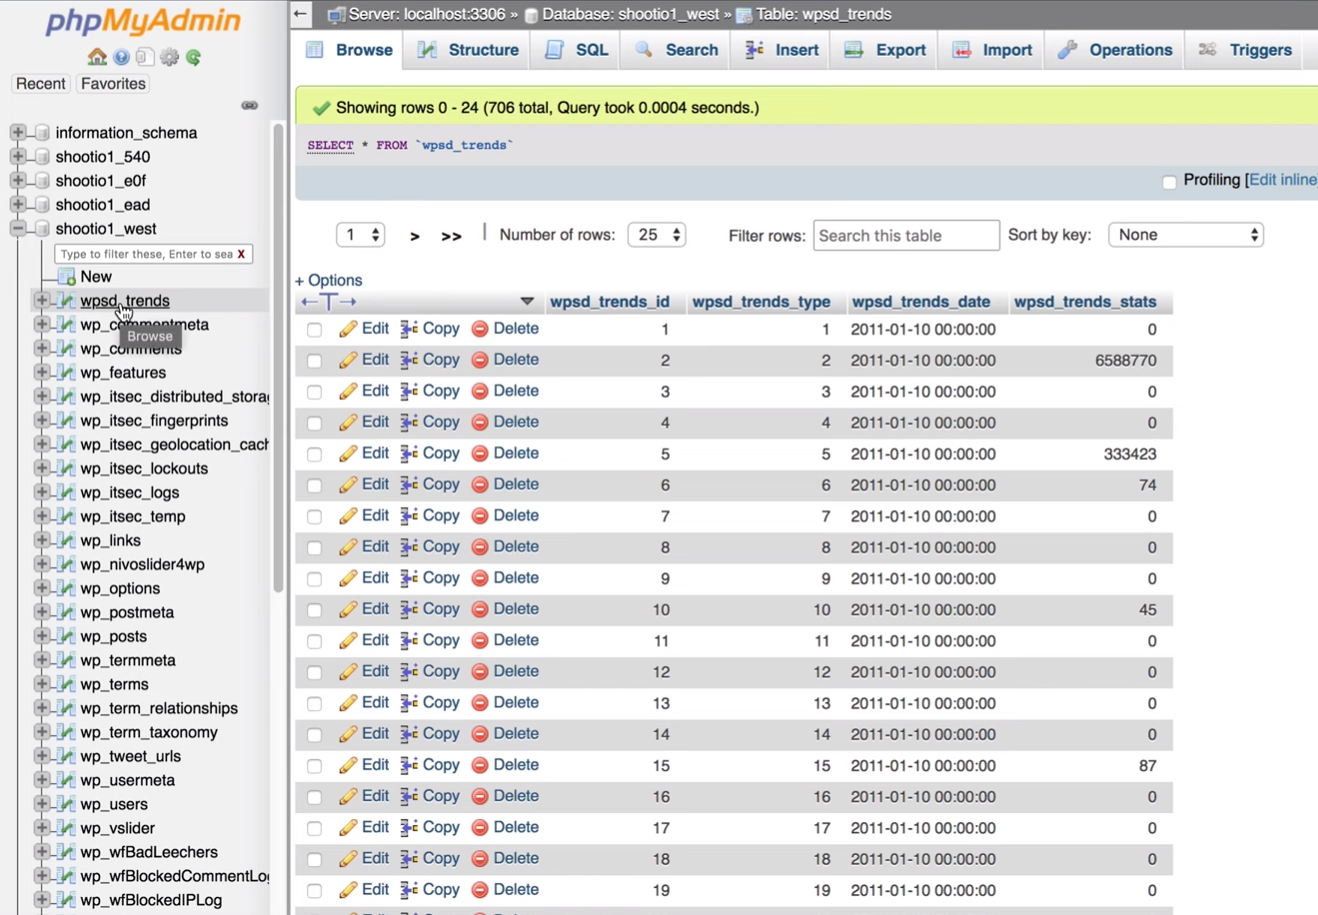
Select Browse to open the result in a new tab. The file wp_options is the most likely of the results to have malware since this is where files for plugins are stored.

Go through each of the files to see what should be deleted. Double click on the result to see the details.
If you delete the wrong file it’s possible to lose the settings of a plugin. Be sure to look for transients that are associated with files you’ve deleted. It’s usually safe to delete transients since they are temporary files, but make sure they’re not part of a scheduled process like with WooCommerce or other plugins.
Check the Site
Now it’s time to check the site again. Here are the things to check.
1. Reload WordPress
Reload the website and check your WordPress version.
The frontend will show your new theme (if you changed it like we did here) and all of the content should show up as expected. Make sure that it doesn’t redirect to a warning page. Also, load the site in incognito mode so it isn’t using cache and try several browsers to make sure the site is working as expected.
2. Test the Site with Sucuri Site Check
Check the site with the Sucuri Site Check. It should show No Malware Found. It will still be blacklisted until you resubmit the site and it’s evaluated.
Inoculate Your Site Against Future Infection
Here are a few more steps to take to ensure your site remains malware-free.
Update PHP
In your cPanel, check if the host is running a secure version of php. This host is running 5.6.40. As of this writing, it is secure, but it will need to be upgraded to php 7.2. The current version might break some old plugins, but you need to update to new plugins anyway.
Delete or Clean Other Websites
Make backups and delete any websites that are not in use. These sites can be infected with malware and the problem will return. If you need to keep the sites then go through the cleaning process for every site on the server.
Install & Configure a Security Plugin
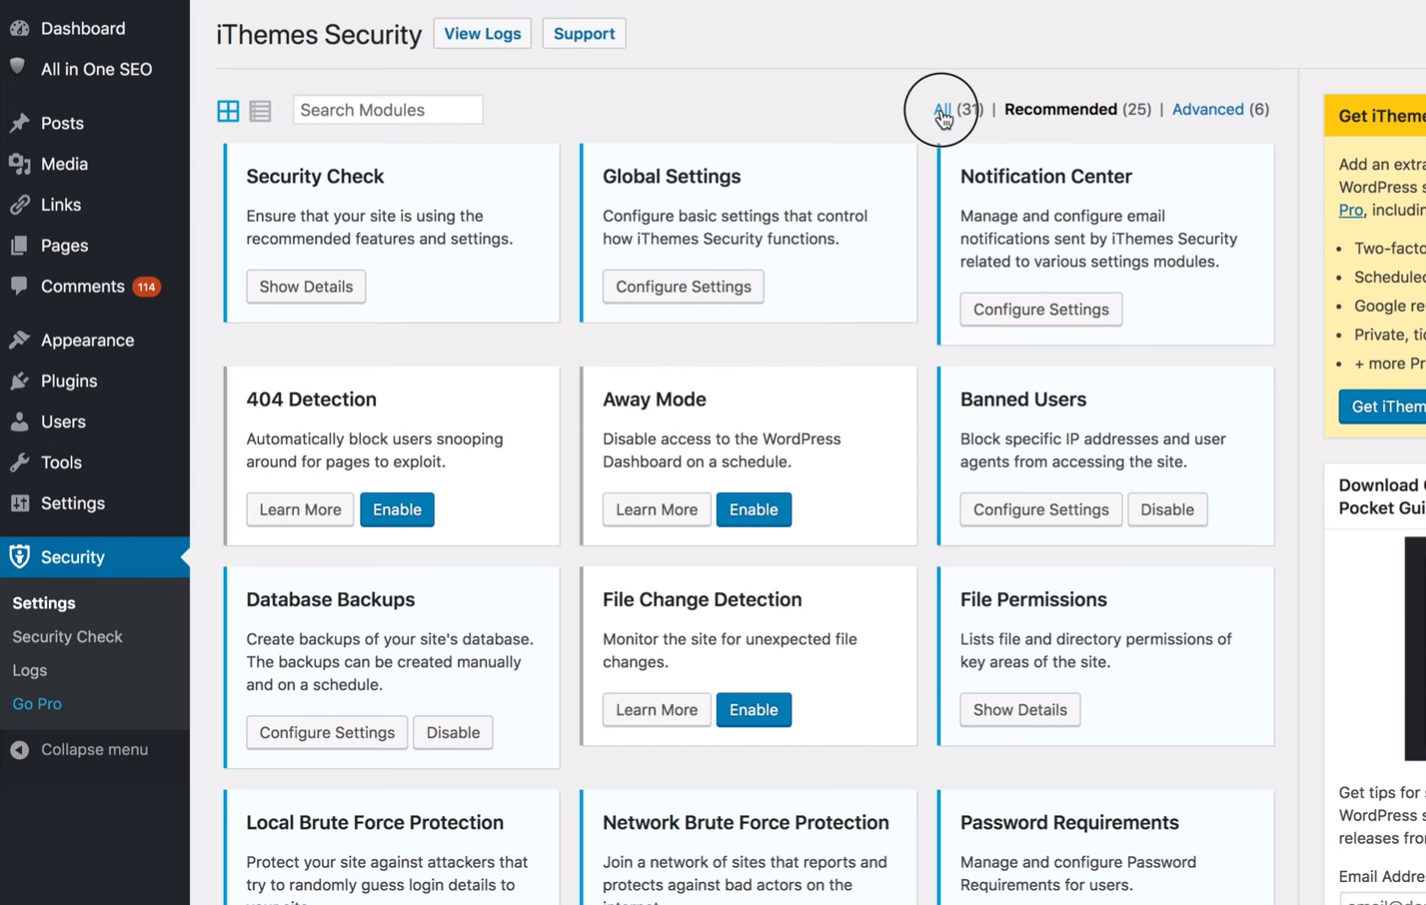
Make sure you install a good quality security plugin. iThemes Security is an excellent choice. It’s best to set up the plugin manually. Install it from the WordPress depository and then click All to see the features. Here are some recommended settings.
iThemes Security Global Settings
- Allow iThemes Security to write to the wp-config and .htaccess files.
- Add your own IP address to the lockout white list to ensure you don’t accidentally get locked out of your own site.
- Select File Only for the log type. This allows it to write to a file on the server instead of adding it to the database which keeps the database faster and running more smoothly.
- Reduce the Days to Keep File Logs from 180 to 30 or 60 days.
- Decide if you want to allow for anonymous data tracking.
- Set Proxy Protection to Automatic.
- Select to hide the security menu in the admin bar.
Notification Center
- Disable email notifications.
- Set the default recipients.
It’s okay to disable most of the notifications since iThemes Security takes care of security for you. Here are the rest of the settings we like to use:
- 404 Detection – Enable 404 Detection. This allows you to ban users that have tried to hit files that are not there within a certain number of minutes. It keeps hackers from trying to keep trying logins or looking for vulnerabilities in your site.
- Admin User – This lets you change the default admin user name which makes it more difficult for hackers and bots that try to login to the site because it isn’t the default user name that they already know.
- Away Mode – Away Mode lets you lock users out of the site during certain times of the day. This isn’t recommended because there might be occasions when you’ll need to log in during those hours and you won’t be able to.
- Banned Users – Enable the default blacklist.
- Change Content Directory – This isn’t recommended because it actually isn’t helpful.
- Change Database Table Prefix – Changing the database table prefix makes it more difficult for hackers and bots to gain access to the database.
- Database Backups – It’s okay to disable Database Backups if you’re running them on the server level or if you’re creating them somewhere else.
- File Change Detection – This includes a list of files and detects if those files have been changed. It also allows you to add files to the list.
- File Permissions – This shows the status of files and suggests values. You can change the values of the files in cPanel or FTP.
- Hide Backend – This allows you to change your login location so it isn’t so easy to find. It can cause problems with plugins, so you’ll need to test it.
- Local Brute Force Protection – This bans anyone that makes multiple failed attempts at logging in. It keeps someone from trying thousands of passwords until they get the right one.
- Network Brute Force Protection – This also protects against multiple failed attempts to log in, but it sends the information to iThemes to create a database of which users to block on all sites.
- Password Requirements – This enforces certain requirements to ensure that users have secure passwords.
- SSL – This forces SSL so communications between your server and the visitor’s browser are secure. Enable this if you have an SSL certificate installed and your host doesn’t force SSL.
- System Tweaks – These are advanced tweaks to protect system files, disable directory browsing, disable PHP in the uploads folder, and lots more. Test each one to ensure it’s not breaking something on your site.
- WordPress Tweaks – This allows you to disable WordPress features that you’re not using. You can remove the Windows Live Writer header, remove the RDS header, reduce comment spam, disable the XML-RPC, etc.
- WordPress Salts – This automatically changes the WordPress Salts. These are the keys in your wp-config file. Alternately, you can create your own WordPress salts to add to the wp-config file manually. Go to the WordPress.org Salt Generator and copy and paste the keys into your file.
Database Username and Password
Add a new user so you’ll have a new username and password. Go to your MySQL database in the cPanel and find your database.
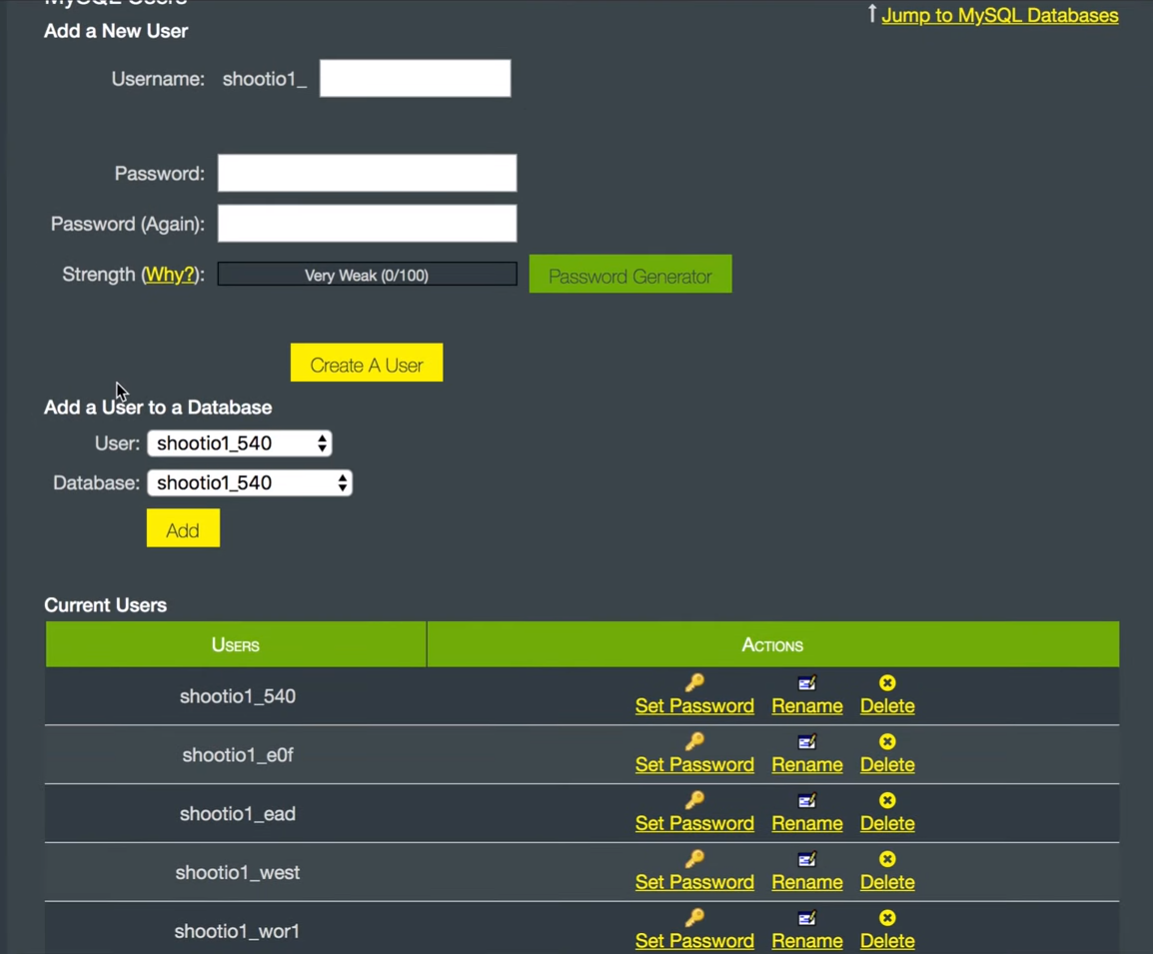
Create a new user and add the user to the database.

Give them All Privileges.
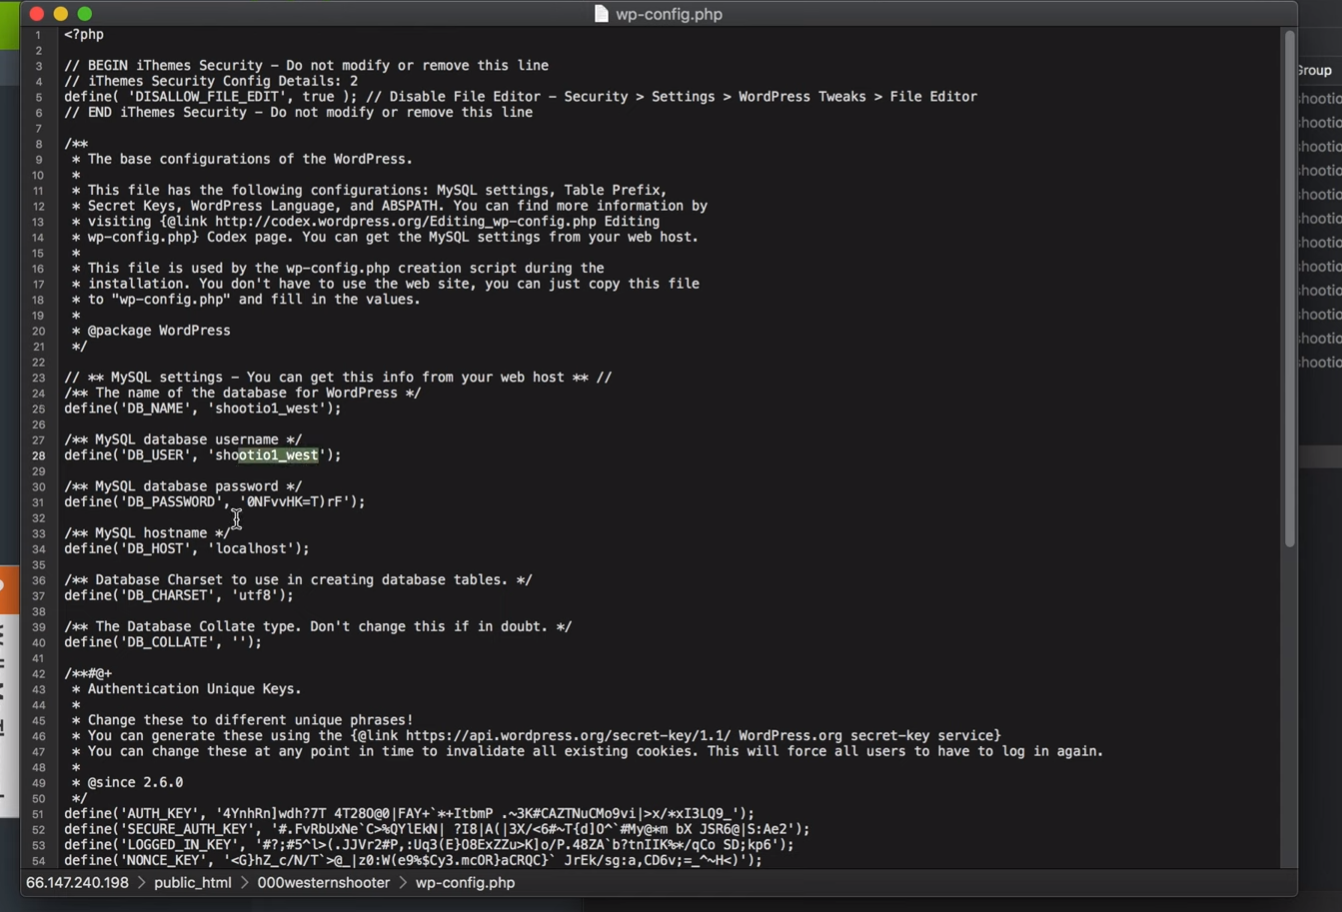
In the wp-config file, change the username and password.
The database now has two users. Revoke the privileges of the old username. Delete the old username.
Ending Thoughts
That’s our look at how to clean a hacked or infected WordPress website. This fixes the majority of hacks you’ll see with WordPress websites. It’s not that difficult but it does take time to go through the steps.
This isn’t meant to be an exhaustive tutorial, so it’s possible to be infected on a deeper level within the server than what’s covered here. This cleans up everything at the WordPress level. It’s still possible to have malicious code deep within the server’s software stack. Though that’s less common these days because WordPress is so popular and more and more hosts are using different software stacks and security measures to protect the server.
You might also consider using something that scans the database like WordFence. If this doesn’t solve your hacking problem you’ll need to work with your host to go deeper. They should be able to scan the database and the server for you.
Have these steps helped you clean a hacked or infected WordPress website? Let us know about your experience in the comments. Or perhaps this is just too much for you, and you’d like a team of WordPress security experts to clean your site, then monitor and maintain it to prevent future infection? If so contact us today or check out our support and maintenance plans here at wpXPRESS.


One of the biggest things that you can do to protect your website from future infections is to change all of the password login information that has to do with every single account related to your website. This not only includes the login to your actual website administrative area but also the login details to your hosting company and to your database. Also f you are using any type of extra service that is tied or connected to your website make sure that you change all of the password information to these accounts. If you have other users beside yourself in any of the accounts related to your website you need to also change the passwords on those as well.
Great tip Jarrett. Very important.
Thank you for this tutorial it helped a lot. Also this scanner https://scan.attacker.net helped finding it. Thank you
Great article, especially the part about cleaning the Database, I never think to check if the database is infected because I’ve never been able to diagnose any issues that were done to the DB.
I’ve recently documented a simple way to clean up most of the WordPress malicious files with the help of WP-CLI, but it does require some Linux shell experience.
This is the blog post I wrote explaining the steps I made:
http://webdevsguide.com/blog/how-to-clean-a-hacked-wordpress-website-with-wp-cli/